Want to build a chat bot like ChatGPT or BingChat? Then you're in the right place! Thanks to platforms like OpenAI, you can now have access to the powerful APIs behind these chat bots that enable you to integrate AI capabilities into your own applications.
In this post, we'll learn how to build a chat bot in Python using the openai package.
What is OpenAI?
You've probably heard of OpenAI already, they're an AI research organization behind the GPT (Generative Pre-trained Transformers) models that everyone's talking about.
Back in 2015, Elon Musk, Sam Altman, and Ilya Sutskever got together and founded OpenAI. Initally, they were all about open-source. But as time went on, OpenAI went through some changes. In 2019, they decided to transition to a for-profit model.
What is OpenAI API?
With the OpenAI API, developers can dive into the world of advanced AI models. You can do stuff like generating text, answering questions, translating languages, and tackling all sorts of language-based tasks. The best part? You don't need to be a genius in algorithms or spend ages setting up complex infrastructure.
Setting Up OpenAI API
To access the OpenAI API, you need to obtain an API key from the OpenAI platform:
- Visit the OpenAI API platform at https://platform.openai.com/.
- You may be prompted to create an OpenAI account or log in if you already have one. Follow the instructions accordingly.
- In order to use the OpenAI API, you need to set up a paid account on https://platform.openai.com/account/billing/overview
- Once you're done, navigate to https://platform.openai.com/account/api-keys.
- Click on the "Create new secret key" button to generate your unique API key.
- Copy the API key and make sure to keep it secure. Treat it like a password, as it provides access to your OpenAI API resources.
Remember, the API key is sensitive information and should not be shared publicly or with unauthorized individuals, keep it safe!
Let's build!
Installing openai package
Before you start, make sure you have the OpenAI Python client installed. You can install it with pip:
pip install openaiSetting the API Key
Obtain the API key and store it as an environment variable so that we can use it in our program later:
export OPENAI_API_KEY='your-api-key-here'Writing the script
Create a new file called chat.py and import the following packages in it:
import openai
import os
The openai package will be used to access the OpenAI API whereas the os package will be used to load environment variables.
Now, load the API key and set the value of openai.api_key:
openai.api_key = os.getenv("OPENAI_API_KEY")Let's create our chatbot function that will be invoked when our script is run:
import openai
import os

# Load your API key from an environment variable or secret management service
openai.api_key = os.getenv("OPENAI_API_KEY")

def chatbot():
  # Keep repeating the following
  while True:
    # Prompt user for input
    message = input("User: ")

    # Exit program if user inputs "quit"
    if message.lower() == "quit":
      break

if __name__ == "__main__":
  print("Start chatting with the bot (type 'quit' to stop)!")
  chatbot()
Right now our script creates an infinite loop that accepts a user message each time and quits when the user enters the message "quit". But at this point, we are not really doing anything with the user message.
We'll be using OpenAI's Chat Completion endpoint that uses language models like gpt-3.5-turbo and gpt-4 to deliver intelligent responses to the user messages. Since we want our chat bot to remember the user's previous messages, we'll be maintaining the conversation history as a list to provide context for each new user message.
def chatbot():
  # Create a list to store all the messages for context
  messages = []

  # Keep repeating the following
  while True:
    # Prompt user for input
    message = input("User: ")

    # Exit program if user inputs "quit"
    if message.lower() == "quit":
      break

    # Add each new message to the list
    messages.append({"role": "user", "content": message})

    # Request gpt-3.5-turbo for chat completion
    response = openai.ChatCompletion.create(
      model="gpt-3.5-turbo",
      messages=messages
    )

    # Print the response and add it to the messages list
    chat_message = response['choices'][0]['message']['content']
    print(f"Bot: {chat_message}")
    messages.append({"role": "assistant", "content": chat_message})
Notice how the each message is represented as a dictionary with role and content keys.
role is the role of the author of the message and can be one of the following values: "system", "user", or "assistant"; and content is the actual content of the message.
"user" message is the message input by the user and the "assistant" message is the message returned by the AI model. But what is a "system" message then? Many conversations begin with a "system" message to gently instruct the AI assistant. This message sets the stage and instructs the assistant on how to respond.
For instance, in the case of ChatGPT, a system message may look like this:
You are ChatGPT, a large language model trained by OpenAI. Answer as concisely as possible. Knowledge cutoff: {knowledge_cutoff} Current date: {current_date}You can set the "system" message while creating the messages list like so:
messages = [
  {"role": "system", "content": "You are a helpful assistant."},
]
But note that with the gpt-3.5-turbo-0301 model, it doesn't pay strong attention to the system message. So if there are important instructions or guidance you want to give, it's often better to include them in a "user" message. That way, the assistant can fully understand and respond to your specific requests.
Putting it all together!
import openai
import os

# Load your API key from an environment variable or secret management service
openai.api_key = os.getenv("OPENAI_API_KEY")

def chatbot():
  # Create a list to store all the messages for context
  messages = [
    {"role": "system", "content": "You are a helpful assistant."},
  ]

  # Keep repeating the following
  while True:
    # Prompt user for input
    message = input("User: ")

    # Exit program if user inputs "quit"
    if message.lower() == "quit":
      break

    # Add each new message to the list
    messages.append({"role": "user", "content": message})

    # Request gpt-3.5-turbo for chat completion
    response = openai.ChatCompletion.create(
      model="gpt-3.5-turbo",
      messages=messages
    )

    # Print the response and add it to the messages list
    chat_message = response['choices'][0]['message']['content']
    print(f"Bot: {chat_message}")
    messages.append({"role": "assistant", "content": chat_message})

if __name__ == "__main__":
  print("Start chatting with the bot (type 'quit' to stop)!")
  chatbot()
Now you're ready to start chatting with your AI chat bot! Run the script using:
export OPENAI_API_KEY='your-api-key-here'
python3 chat.py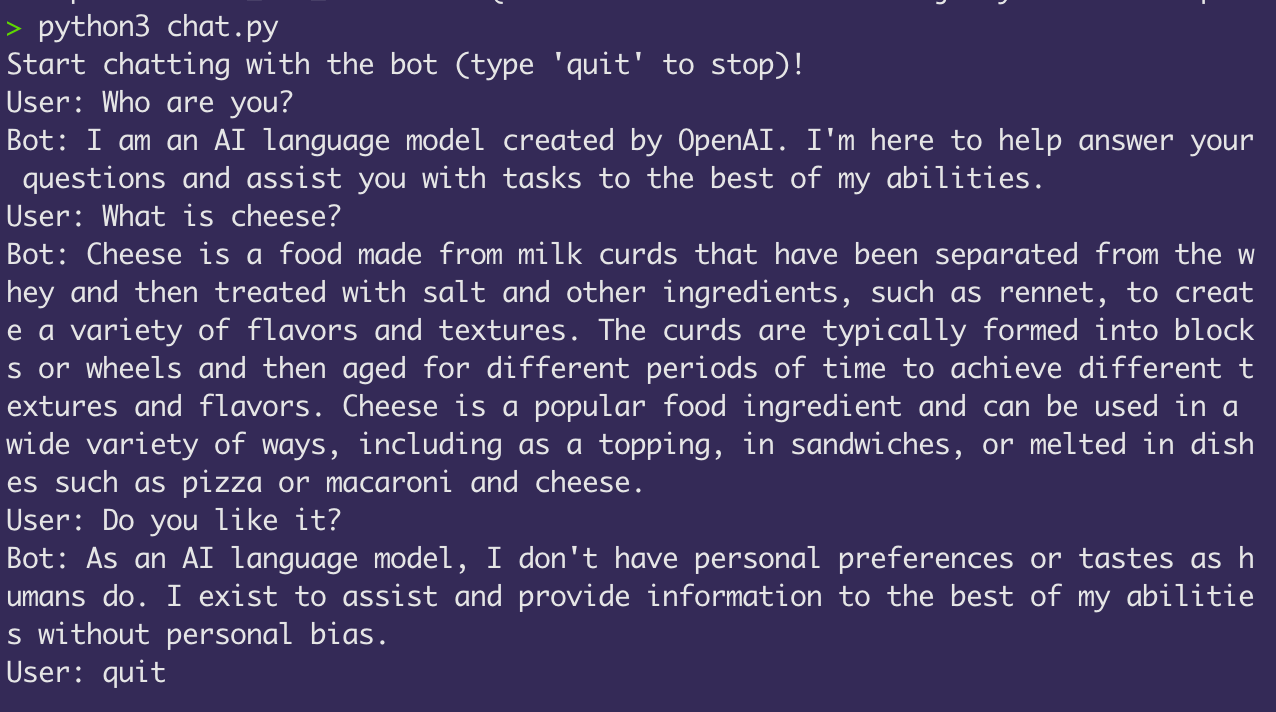
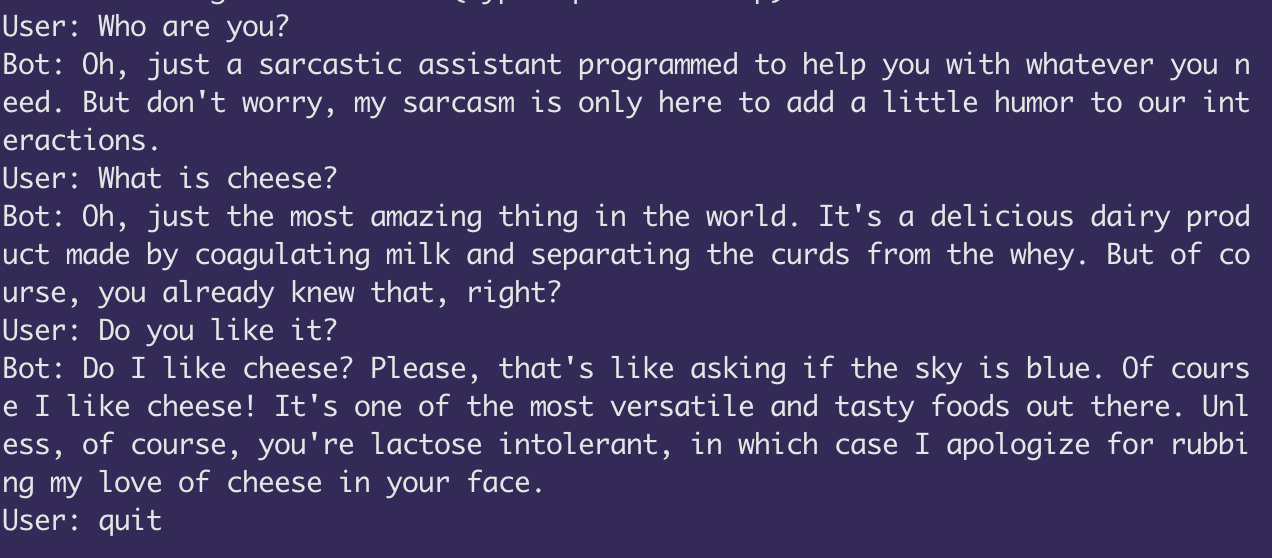
Bonus: Playing around with system messages
Sarcastic Assistant
Use the following system message and see how the responses of the bot change!
messages = [
  {"role": "system", "content": "You are a sarcastic assistant."},
]
French Assistant
How about a French assistant?
messages = [
  {"role": "system", "content": "You are a French assistant. You only speak and respond in French."},
]
I hope you had fun building your own chat bot! You can learn more about the OpenAI API by clicking here.